THE CUTICLE
Do you know where the cuticle is? Are you supposed to push, clip or scrape?
The correct answer might surprise you. It’s “Scrape.”
This is probably one of the most important articles you will read about nail care.
In this article, you’ll learn:
- What and where the cuticle is
- Some important nail anatomy names
- How to remove the cuticle properly
We’ve Been Duped
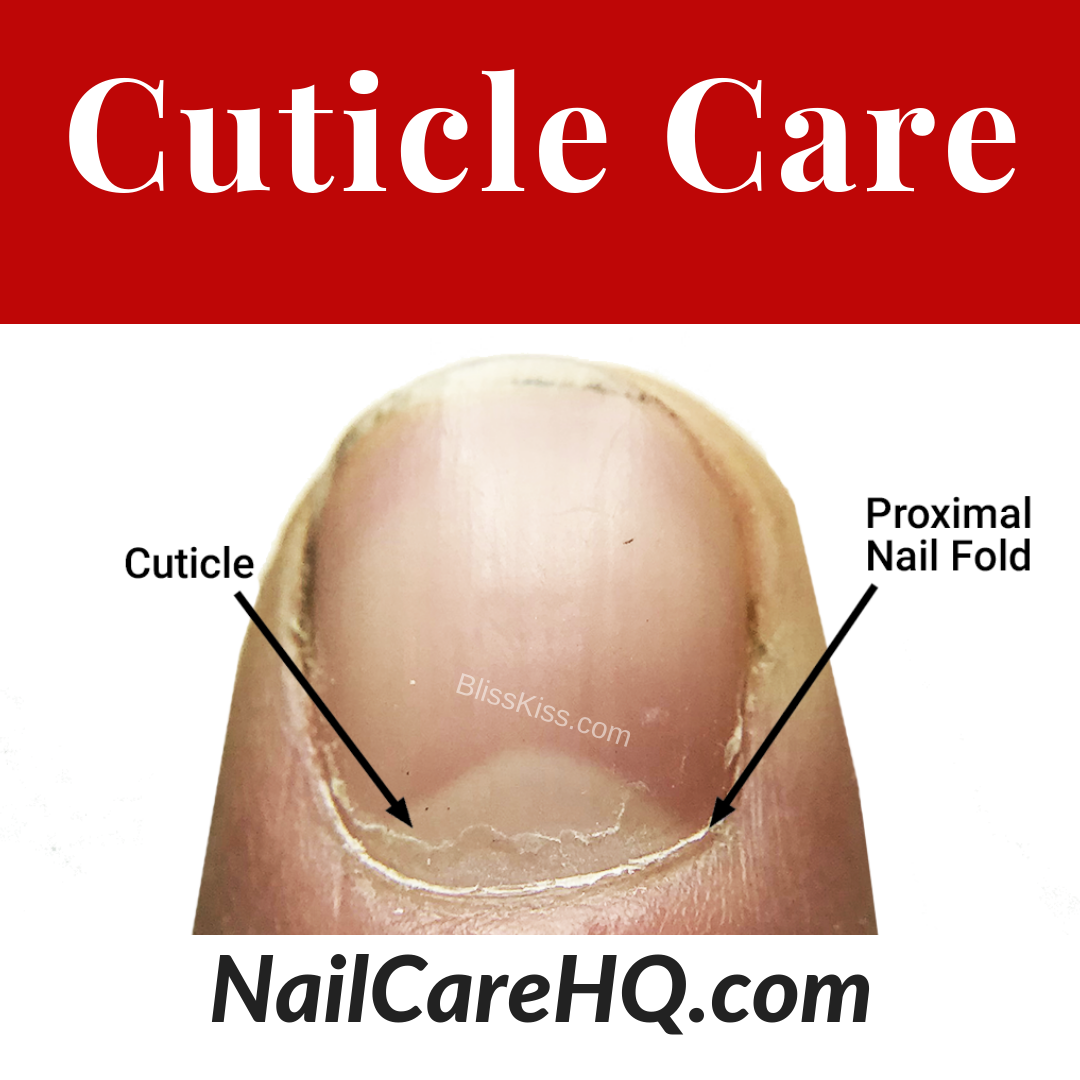
The entire planet has been taught the incorrect definition for the “cuticle”.
The tight band of skin at the base of your nail plate is NOT the cuticle.
That band of skin is called the “keratinized proximal nail fold ” or “nail fold”.
In human anatomy, cuticle (sometimes confused with eponychium) refers to several structures. It refers to the layers of epidermal cells or keratinocytes that produce the horn protein keratin, and also to the superficial layer of overlapping cells covering the hair shaft (cuticula pili) that locks the hair into its follicle (See also Cuticle (hair). [Source: en.wikipedia.org]
So where is that elusive cuticle if what we’ve been taught is incorrect?
The cuticle is a thin layer of dead tissue riding on the nail plate to form a seal between the nail plate and eponychium to prevent pathogens from infecting the matrix area.
The cuticle pulls away from the underside of the eponychium and attaches tenaciously to the nail plate.
The cuticle should NOT be confused with the “eponychium”. ~Doug Schoon, Nail Structure and Product Chemistry
The Proximal Fold of the Eponychium
Please, please, please…DO NOT CUT THIS SKIN!
The proximal fold is a required guardian seal that prevents germs and bacteria from getting to the nail matrix, where new cells are created.
I always know when girls and women are clipping and nipping. Their entire cuticle line is red and inflamed. Basically, their eponychium is infected all the time.
If you go to a salon for a manicure, do not ever let your nail tech cut this skin.
The best way to keep this skin soft and tight to the nail plate is with a high quality, jojoba wax ester based penetrating nail and cuticle oil.
Where Does The Cuticle Come From?
How the cuticle is created is fascinating to me and sounds like it should be painful.
But it isn’t.
The Death Grip
CLICK PICTURE FOR LARGER DETAIL
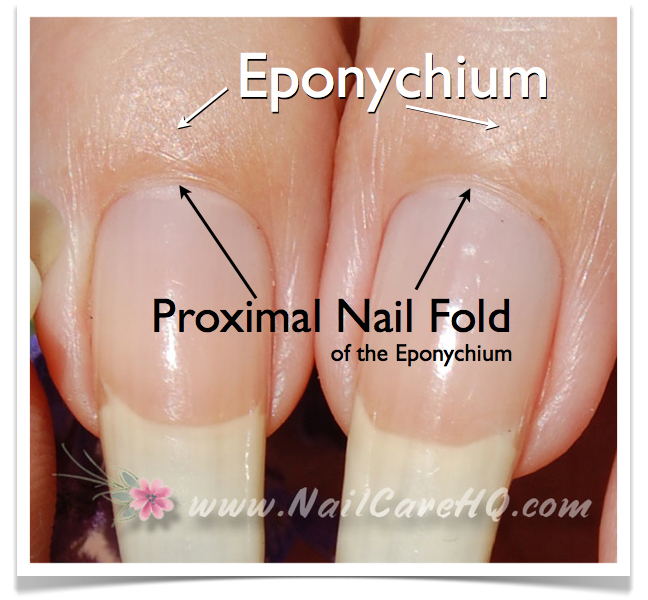
The eponychium is living skin that covers approximately 20% of the nail plate, right over the matrix.
The eponychium is a very important guardian seal preventing germs and bacteria from getting into the matrix.
Not surprisingly, the tissue that sits upon the nail plate is very different from the visible eponychium.
The underside of the eponychium nail fold has a strange, sticky texture. This is why it is so important to NOT dig a tool underneath the nail fold.
As the nail cells are created and pushed forward, the nail plate literally rips the bottom layer of eponychium cells with it.
It is these cells that are the cuticle.
Cuticle cells also tightly grip the proximal fold of the eponychium. This creates a nice, tight guardian seal.
For some people, the proximal fold releases from the cuticle on its own.
For people like me, that death grip is too strong. My cuticle will pull the nail fold and stretch it out very thin.
In the photo above, you can see both examples. One half of the proximal fold has released on its own and the other half is still being stretched.
Most people can’t see their cuticle since the skin is so thin, but this photo captured it perfectly.
Breaking the Cuticle’s Grasp – Push Back
Should you push back your proximal fold?
I do, but it’s completely up to you.
When you release the grip, your proximal fold is able to stay nice and tight. As long as you don’t push too hard with your fingernail, the healthy seal under the eponychium stays intact, and your matrix stays healthy.
You don’t ever want to push so hard that your fingernail or tool goes under the proximal fold.
My Experiment
I did an experiment to figure all of this out. I stopped pushing back my nail folds for 3 weeks to see what would happen.
The proximal folds were stretched an additional 3 millimeters! I also started getting those painful, thin hangnails that tear and bleed on my eponychium.
When I released the nail folds from the cuticle, the skin remained stretched out.
Within 24 hours that skin was drying out and I had a strong desire to clip it.
Ah-ha!
I had finally figured out why people clip their proximal folds!
Geeky…but that was an exciting discovery for me. Since I’ve always pushed back my proximal folds, I’ve never had the desire to clip before.
I started oiling and massaging that skin several times a day. Within a week my proximal folds were back to normal and looking beautifully healthy.
The Solution?
Simply use your fingernail to gently push back the proximal fold to break the death grip about every 4 to 7 days.
If your nails are really short, you can use an orangewood stick. Just be gentle.
If you keep your skin hydrated with a high quality, jojoba wax ester based penetrating nail and cuticle oil, then it will be easy to push back your nail folds.
This can also be done in the shower. Just make sure you are wearing one coat of base coat when showering.
Many of my readers know that my #1 Rule is “Never Shower Naked”.
Proper Cuticle Removal
Since polish and nail enhancements don’t bond to the skin on the nail plate, the cuticle should be properly removed with gentle scraping.
Again, some people are able to scrape the cuticle off with their fingernail in the shower.
Others like to use a cuticle remover.
How Cuticle Removers Work
The best ingredient to dissolve human protein cells is “lye“. You’ll also find it labeled as potassium hydroxide, sodium hydroxide, or caustic potash.
Lye is largely used in the soap making process. All cuticle removers contain lye.
Personally, I love using a cuticle remover. Some people hate it.
Currently, I use the Sally Hansen™ remover that looks like a blue gel. Another favorite of many nail artists is Blue Cross™.
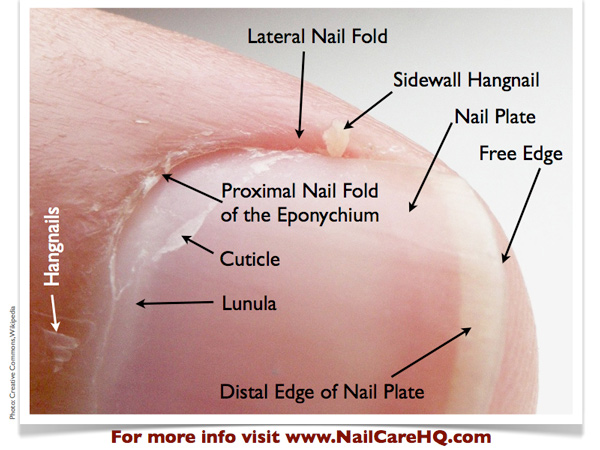
I’ve used Blue Cross™ and I hate it for 3 reasons. It’s too watery, it eats my live skin, and causes those tiny strips of shredded skin below the proximal fold. You can see some of those hangnails in the photo farther up in this article.
Lye Dissolves All Skin
The cuticle is dead skin.
The proximal nail fold is live skin.
Cuticle removers have no preference.
The directions on all cuticle removers tell you to apply it to only the nail plate and do not let it touch your skin.
As many of you know, that is easier said than done.
I have much more control with a cream or gel type of remover. Watery removers wick all around on your live fingertip skin.
What’s In Your Toolbox?
Orangewood stick?
Plastic cuticle tool?
Or metal cuticle tool that follows the curve of your nail plate?
Doug Schoon prefers that people use the orangewood stick. I think it’s most likely because the metal tool is widely abused.
If you use too much downward pressure near the proximal nail fold, you can cause damage to the matrix. This damage is often seen as white spots in the nail plate. These are nail bruises.
Personally, I like the metal, spoon-shaped tool. It’s faster.
As a busy mom and businesswoman, I don’t often get the luxury to do my nail care the slow way. I also use the tool correctly, which I explain in more detail below.
Depending on your budget, try different tools to see what you prefer. You might just find that using your own fingernail works well too.
The Solution?
For two years I have been looking for a solution to the strong, dissolving power of cuticle removers without damaging my skin. And I finally found it.
Simply cover your skin with a layer of a liquid latex barrier, or watered down white glue (25%/75%) if you have a latex allergy.
Let it dry and then you are free to apply cuticle remover safely.
From Start to Finish
-
- Apply your skin barrier and allow to dry.
-
- Apply the remover following the manufacturers’s directions.
-
- Using a cuticle removal tool–gently, gently, gently–scrape back and stop right at the proximal fold. Glide the tool against the surface of your nail plate. The remover solution will have dissolved the cuticle so downward pressure is unnecessary.
-
- The cuticle will build up on the back of the remover. Wipe that onto a paper towel.
-
- Turn the tool 90 degrees to your your nail plate, and slide the tool along your proximal fold to scoop away the remaining cuticle and remover.
- Once you are finished, remove the barrier and rinse your hands with water.
In Conclusion
I hope you’ve found this article helpful.
Just remember, with all of your nail care and nail enhancement product use… if it hurts… stop.
Ana,
No matter what I do I get sidewall hangnails! Some are tiny some aren’t. What can you suggest for this?
Isamar, those are actually true hangnails, a little bit of the nail splinters away from the nail plate. Those need to be clipped off with with tiny nail clippers meant for infants. I’ve written an article that discusses hang nails in much more detail at https://www.nailcarehq.com/stop-biting-skin/
So informative. I’ve learned a lot and will definitely start taking better care of my nails and cuticles thanks to this article.
Ana… BRAVO!!! I have learned so much from this article, and all the others!! This showed me what I was doing wrong. Even with the multiple times I moisturize and use cuticle the oil, my proximal folds still dry out and become so jagged, I have to that them. I’ll do my best to leave them alone and I’ll keep you posted.
This is such a helpful article! It’s so frustrating to know that we’ve been taught so many false ideas, and I’m happy to have you to set us straight! Thank you for sharing your expertise and for making Simply Peel™. I can’t wait to get it in the mail!
What an excellent article. Thank you Ana. I for one have been cutting my proximal fold for years with the result that when they grow, they grow hard. WIll nail oil ultimately soften them up? I have just recently started using an orange stick to push back my death grip cuticles. So looking for an improvement shortly.
Thank you for a really informative blog.
Ana!.. This article is amazing!.. Thank you for all this info, I’ve realised I haven’t been looking after my cuticles the correct way.. I now know what I need to do.. Thanks so much!!
Kareen, you are most welcome! ~Ana
Hi Ana! Great article, why is that nail science is so intriguing but school science is SO not lol? My eponychium is really loose, I don’t know of this is from years of clipping my “cuticles”, myself and salons. When I push it back it doesn’t hurt, but I am concerned that the skin is so loose. Have you ever heard of that before?
Lauren, you should be fine. Just allow your body’s natural mechanism to take over during the next few weeks. Then gently push the nail fold to release it from the cuticle. Over time you will be just fine.
Absolutely love this article
Hi: I am interested in the barrier product. Is there a video of the complete process? Thank you for all the information. I am tryng to convince my manucurist to use this process. She does not speak English and a video would help tremendously.
Hi Elena, Yes, I have links to short Instagram tutorial videos on the product page at https://www.nailcarehq.com/shop/simply-peel-liquid-latex-barrier/
Thank you. Just, thank you. This could not be a more concise, intelligent article. Please continue!
Ana,
Thank you for such wonderful and detailed information. Thank you for taking the time to inform us.
Have a wonderful day.
Awesome article! I’ve learned so much!
~IG: @daksnails
Oh my gosh, thank you so much for this! I have been trying to figure out how to care for that part of my nail. I have been clipping for YEARS and YEARS.. I will never purchase another pair of “cuticle nippers” again. The hard part is going to be ignoring the ocd telling me to clip clip clip. Lol Thanks again.
Great article! So very informative!
This has been quite the eye opener. I have unknowingly been abusing my nails. Thanks Ana for the information. ( it’s so weird to call someone else by your name, and you spell it the same). Love your articles.
Wow! What a great article. You have convinced me.
I’m so glad I read this article. I’ve been scraping my nails to hard n pushing my cuticles back to far. Very helpful thank you
I have been cutting my cuticles for the a few months today I was going to do it but after reading the article I decided I’m going to stop. Thank you for this detailed article, it was very informative and helped me realise a lot of stuff I was doing good wrong and what I was doing right. So thank you
Ana, you are amazing!
tku
Ok so here’s the thing.
My proximal folds grow twice as much as yours. I keep them moisturized and of course never cut them anymore. I have stopped for several months now.
I’d really like to buy your Pure Nail Oil but since I’m slightly underaged (will turn 18 in three months) my parents won’t let me buy it since I spend already too much on nail care.
Is there any way I can improve the condition of both my proximal folds and my nails without your Pure Nail Oil?
Thank you very much.
Katherine.
I bought some cuticle remover but don’t understand how often I should use it how often should I use it? Is it a once a week thing or once a month.
Every two to three weeks. To protect your skin, you should use Simply Peel™.
For two years I have been looking for a solution to the strong, dissolving power of cuticle removers without damaging my skin. And I finally found it.
Simply cover your skin with a layer of a latex barrier like Bliss Kiss™ Simply Peel, or watered down white glue (25%/75%) if you have a latex allergy.
Let it dry and then you are free to apply cuticle remover safely.
From Start to Finish
Apply your skin barrier and allow to dry.
Apply the remover following the manufacturers directions.
Using a cuticle removal tool–gently, gently, gently–scrape back and stop right at the proximal fold. Glide the tool against the surface of your nail plate. The remover solution will have dissolved the cuticle so downward pressure is unnecessary.
The cuticle will build up on the back of the remover. Wipe that onto a paper towel.
Turn the tool 90 degrees to your your nail plate, and slide the tool along your proximal fold to scoop away the remaining cuticle and remover.
Once you are finished, remove the barrier and rinse your hands with water.
Adrienne
Assistant to Ana
This article was so informative, Ana. Thank you, so much.
I learned so much reading this article. Last week I just ordered you simply pure oil, and it just came today. I recently removed acrylic that I had over my natural nails because they were so damaged and I kept getting fungus (because of water). I used acrylic because that’s the only way my nails would grow. That’s before I found YOU. I will be doing your three day naked challenge, and will be updating you with my results. For the next nine months I’ve committed to following your nail care routine. I will update you with those results also.
Thank you so much, Ana! I thought I knew the anatomy of my nail….clearly I did not. But thanks to you, I now know!
amazing
My name is Ana too! You’ve inspired me so much, thank you xoxo
You are welcome!! 🙂
This is very helpful! Your nail care articles are the best
Wow! What an education this has been! I’ve been using all the wrong tools for years. The V-shape trimmer I use leaves my skin inflamed and bleeding. I’m going to try the Bliss Kiss oil, too, because nothing else has worked. I actually bought organic coconut oil at the grocery store that I use at bedtime but it makes your bed sheets smell! Thank you, Ana, for creating a place to go for the proper care of nails. Can’t wait to read more!
Good Morning Ana!
I wanted to thank you for this wonderful and informative article!!! And I cannot thank you enough for your Bliss Kiss Oil! My daughter encouraged me to try it after reading about your success stories, and I cannot tell you how grateful I am that I did try it! My nails look 100x better than anything I have ever tried before!!! In addition, I have psoriasis of my finger tips, which leaves them peeling and very very unattractive looking. Since using your oil, the peeling has subsided and my fingers look normal again!!
I am so very very grateful for your advice, product, and continued support for those of us who struggle with many nail issues. You are spot on with your advice and techniques!!!
You are very welcome!! I am so happy that Simply Pure™ has helped you.
Adrienne
Assistant to Ana
Very helpful article! I think Im going to spend some time reading trough the web site and apply those tips! Thanks!