 How to Fix a Broken Nail
Sometime in a girl’s life, she’s going to get a broken nail. She has two choices; cut her nails to match (nubbins) or create a repair.
I’m partial to my longer nails so I usually chose to take the time to do a repair. With the technique below, I have repaired dozens of side wall tears as well as complete breaks.
I have also helped a couple of friends who have accidentally gotten a nail cut in the middle of the nail plate, right down to the pink nail bed.
Preparation is Pivotal
It’s very important to stock up on your supplies before you break a nail.
The least expensive option is what we in the nail world—a tea-bag repair. You take a little piece of a tea bag, cut it to cover the tear and apply a little nail glue. It will cost you about $3.00 US. This is a fairly weak repair. It will help with a small sidewall tear and usually lasts a few days.
When I was in my teens, I actually used one layer of toilet paper with super glue! I’m totally dating myself—and this was waaaaaaaay before the internet was invented! Ha!
Now that I’m a big girl, I don’t have time for a repair that only lasts a few days.
I’ve moved to having a first aid nail kit with far stronger capabilities. It will also set you back about $25.00 US, but it will last a long time.
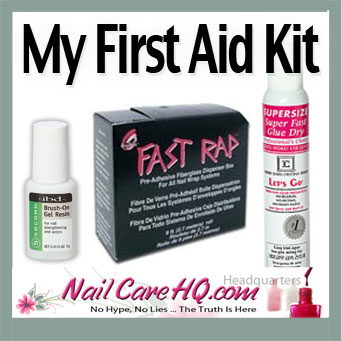
My First Aid Kit for Nail Casualties
Ingredients
1. IBD Brush on Gel Resin – this is a thick form of “super glue”. I’ve tried other brands and like this one best.
The glue will dry on the brush fairly quickly, so don’t freak out. Put a small piece of foil loosely over the glue bottle, fill a shot glass with acetone, and let the brush soak for about 10 minutes. This is the product you will be purchasing a little more frequently. [Sally Beauty Supply]
2. Fast Rap Adhesive Fiberglass Wrap – many people like silk wraps as well. Just make sure they are adhesive. It’s so much easier to apply. I used to be able to buy a small amount from Sally’s, but they discontinued it. This box will probably last 3 of your lifetimes. Team up with a friend. [Amazon or Ebay]
3. Let’s Go Super Fast Glue Dry – Although the Gel Resin says it’s 5 second…that means it sets in 5 seconds. It actually dries in 5-10 minutes! With this product, one quick spray, and the glue is rock hard! It’s super stinky though so spray your nail up against an open window. Sally’s has two brands. Depending on price, either will work. [Sally Beauty Supply]
4. Files – 180, 240, 400 grits. I really like the white Beauty Secrets files with the grit numbers printed right on them. They’re usually really hard to find mixed with the dozens of other styles of files, but they’re my favorite. They’re worth the hunt. #169200 and #169220. [Sally Beauty Supply]
Directions
1. Clean nail with rubbing alcohol
2. Apply a small amount of resin over the tear or crack. I actually hold the nail tear together and ask someone else to apply the resin
3. Spritz with Let’s Go
4. Cut a small piece of fiberglass/silk wrap that will cover your tear or break. I don’t always cover my nail completely. With tears, I only cover 1/2 my nail
5. Use tweezers to apply the wrap. Press down on your nail
6. Apply a layer of resin to cover the wrap and extend a smidgen past the edge of the wrap
7. Spritz with Let’s Go
8. Quickly apply another layer of resin
9. Spritz with Let’s Go. Decide if you need a 3rd layer
10. Now it’s time to file that repair smooth. Using a 180 grit file, smooth the surface of the repair. Be very careful to not file the exposed nail plate
11. Increase to a 240 grit file to smooth the repair more
12. Increase to a 400 or higher grit
13. If you would like, you can even move on to a buffer to make your repair silky smooth. Just be very careful to not buff your nails smooth or you will weaken them. I wrote an article explaining in more detail here.
14. Apply 1 or 2 coats of ridge filling base coat and you are good to go with a normal manicure! Yay!
Removal Process
Since I don’t do my repairs super thick, they usually only last one or two weeks.
You can file it down thin and then apply a new piece of fiberglass and repeat the above directions. Or you can completely remove the repair by soaking a piece of cotton with acetone and applying it to your nail.
Wrap a 4″ square piece of aluminum foil tightly around your nail and let it sit for 10 to 15 minutes. Gently slide the foil off and the repair should come with the cotton.
If it doesn’t, use your finger nails or an orange wood stick to lift the product off your nail. Please do not scrape. It will cause damage to the nail plate, which is discussed in another article. If any undissolved product remains, repeat the foil wrap.
I wouldn’t recommend applying a glitter polish until the break has completely grown out. The long process of the foil wrap removal process will start to dissolve the repair.
Would you recommend still using your Bliss Kiss oil over a tea-bag repair? Would the oil seep through harmlessly or would it cause the repair to peel??
Daniella,
Yes, you can definitely use Simply Pure™ over any nail repairs/nail enhancements. The benefit will be that it will penetrate the top layer of the repair/product to help prevent premature cracking. Your skin will also love it.
What the oil can’t do is penetrate through the repair/nail enhancement to the natural nail plate, in order to increase it’s strength and flexibility. That has to be done on naked nails.
Keep oiling the rest of your nails and let the torn nail grow out with the repair. Once you’re able to to clip your nail after the tear has grown out, all will be good again. Be sure to remove the remaining glue from the repair with a 10 minute foil wrap to let the acetone completely dissolve the glue. ~Ana
You saved my painful spilt nail! Thank you thank you thank you!!!!! I bought all the supply’s at my local Sally’s and it worked beautifully.
Btw-hope your healing well from your surgery! Praying for ya.
So what if you want to change your mani w/o redoing the tear fix? Can you use acetone free remover for the polish and it will not damage the repair? did you happen to test this?